Master Slimline Card Sentiments in Cricut Design Space
The Power of a Well-Crafted Sentiment
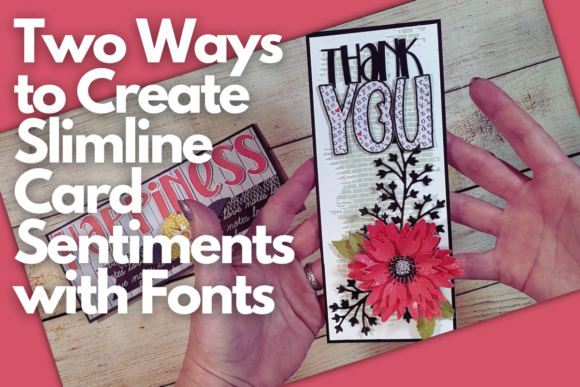
The sentiment is the heart of any greeting card. It’s the message, the focal point, and often the first thing the recipient reads. On a slimline card, with its elongated format, the sentiment carries even more weight. It needs to be perfectly balanced—bold enough to command attention yet elegant enough to complement the design. In the class Two Ways to Create Slimline Card Sentiments with Fonts, you move beyond basic text placement. This is about transforming the fonts you already own into custom, layered design assets that give your cards a professional, three-dimensional quality. The goal is to create a sentiment that doesn't just sit on the card but becomes an integral part of the overall composition.
This intermediate-level course focuses on practical application. You won't just learn theory; you'll follow along with Miss Carrie to create two distinct floral slimline cards. The visual style is modern and clean, with bold typography taking center stage against delicate, layered flowers. The appeal lies in that contrast—the sturdy, confident sentiment against the soft, organic texture of the floral elements. It’s a style that feels both contemporary and timeless, suitable for a wide range of occasions from birthdays to heartfelt thank-yous.
Two Techniques for Custom Sentiments
The core of the class teaches you two specific methods in Cricut Design Space for elevating your font-based sentiments. Both leverage the offset tool, a powerful feature that becomes essential for creating depth and dimension in your papercraft projects.
Creating a Layered Sentiment
The first technique involves building a multi-layered sentiment. You start with your chosen font—perhaps a bold display font or a clean sans serif font—and use the offset tool to create a shadow layer. This isn’t a simple drop shadow effect; it’s a separate, cuttable layer that you can cut from a contrasting cardstock color. The result is a sentiment that pops off the page, adding a tangible, professional finish. This method is perfect for when you want your message to be the undisputed star of the show. It influences visual hierarchy immediately, guiding the viewer's eye directly to the words.
Crafting an Outline Sentiment
The second technique is all about subtlety and sophistication. Here, you use the offset tool to create a thin outline around your text. This outline sentiment can be the sole layer or used as a base for a more intricate design. It’s an excellent choice for when you want a sentiment that feels integrated into the background pattern or when working with a very busy floral arrangement. This approach demonstrates how a creative font can be manipulated to enhance brand consistency and professionalism in a project series. The outline provides a clean, defining edge that improves readability without overwhelming the card’s overall aesthetic.
From Cardmaking to Brand Identity
While the class is framed within Cricut crafting, the principles you learn have direct applications across broader design and marketing projects. The ability to create custom text treatments is a valuable skill for any content creator or small business owner.
Think about logo design. A custom, layered wordmark created using these offset techniques can give a brand a unique, handmade feel that stands out. For social media graphics, these methods allow you to create eye-catching text overlays for Instagram stories or Pinterest pins that feel polished and intentional. The skills translate to packaging design for product labels, to editorial design for magazine headlines, and even to web design for stylized banner text. The font you choose—be it a serif font, a script font, or a handwritten font—becomes more than just text; it becomes a manipulable design asset.
Understanding how to manipulate type this way influences audience engagement. A sentiment that feels crafted and dimensional conveys care and quality, which can positively affect brand perception. It shows a level of detail that resonates with audiences, whether they are card recipients or customers evaluating a brand.
Choosing the Right Font for the Job
The class emphasizes using fonts you own, but not all fonts are created equal for this purpose. Here’s practical guidance for selecting the right typeface for your slimline card sentiments and similar projects.
- Evaluate Weight and Contrast: Fonts with medium to bold weight work best for layered sentiments. Thin, delicate fonts can get lost when you create a shadow layer. A premium font family often includes multiple weights, giving you flexibility.
- Consider X-Height and Legibility: Fonts with a larger x-height (the height of lowercase letters like 'a' or 'x') tend to be more legible at smaller sizes, which is crucial for card sentiments. Always test the readability of your chosen font before committing to a cut.
- Test for Outline Compatibility: For the outline sentiment technique, avoid fonts with extremely thin strokes or highly intricate swashes. The offset tool needs enough surface area to create a clean, separate outline. A sturdy modern typography face is often a safe bet.
- Review Included Styles: Some commercial fonts come with stylistic alternates, ligatures, or multiple stylistic sets. These can add a unique flair to your sentiment before you even apply the offset effect.
- Check Commercial Licensing: This is non-negotiable. If you plan to sell your finished cards, you must ensure your font’s license permits commercial use in physical end products. This applies whether you use a free font or a premium font.
When evaluating project fit, ask yourself: Does this font’s personality match the card’s occasion? A playful handwritten font might be perfect for a child’s birthday but less so for a formal wedding card. The class provides a downloadable font and flower graphic to get you started, allowing you to practice these evaluation skills immediately.
Practical Application and Design Flow
The real value of Two Ways to Create Slimline Card Sentiments with Fonts is in its hands-on, project-based approach. You’re not left to figure out the application alone. By following the creation of two complete floral cards, you see the entire design flow: from selecting and typing the sentiment, to applying the offset for layering or outlining, to assembling the card with three-dimensional flowers.
This process teaches you about spatial relationships on the slimline canvas. You learn how to balance a bold, layered sentiment with intricate floral elements, ensuring neither overpowers the other. It’s a lesson in font pairing in a practical sense—pairing a bold typographic element with organic graphic elements. The class likely includes tips on welding script fonts for a seamless cut and attaching elements to ensure precise placement, which are essential techniques for any Cricut user looking to advance their skills.
Ultimately, mastering these techniques gives you control. You are no longer limited to pre-made sentiment stamps or stickers. You can create custom messages in any font, for any occasion, with a professional, polished finish. This skill elevates your crafting from hobbyist to artisan, and the principles can inform every design decision you make, whether you’re creating a personal card or developing a cohesive brand identity for a client. The ability to manipulate typography to this degree is a cornerstone of effective visual communication.